What Is a DNS Leak and How to Prevent It?
Using a VPN might seem like a foolproof way to keep your internet activity private, but did you know that a DNS leak could still put your privacy at risk without you realizing it?
A DNS leak occurs when your online activities are visible to your Internet Service Provider (ISP) or even hackers. This means they can track which websites you visit, even when you're using a VPN to stay anonymous.
So, what exactly is a DNS leak, and how does it happen? Are there ways to prevent it? Read on to discover how you can protect your internet privacy!

What is DNS and how does it work?
DNS stands for Domain Name System, a vital part of the internet that allows us to use easy-to-remember website names instead of complex numerical IP addresses. It translates human-friendly domain names (like www.xvpn.io) into IP addresses (like 192.0.2.1) that computers use to identify each other on the network.
When you type a website address into your browser, a DNS resolver starts the process by querying different types of DNS servers, including root, TLD (Top Level Domain), and authoritative nameservers, to find the correct IP address. Once the address is found, it is sent back to your browser, allowing it to connect to the website's server and load the webpage.
💡Learn more: visit our What is DNS page.
What is a DNS leak?
A DNS leak is a security flaw that occurs when your computer's requests to find website addresses accidentally skip the secure VPN tunnel and go straight to your Internet Service Provider (ISP) or another DNS service.
When a DNS leak happens, it can expose your online activities to outsiders. This means that your ISP and even third parties can see which websites you visit and potentially track your browsing activities, compromising your privacy and security.
How does a DNS leak happen?
A complete DNS leak process consists of the following 5 steps:
Step 1: Connecting to a VPN
You connect to a VPN to keep your internet activity private and secure.
Step 2: DNS Resolution
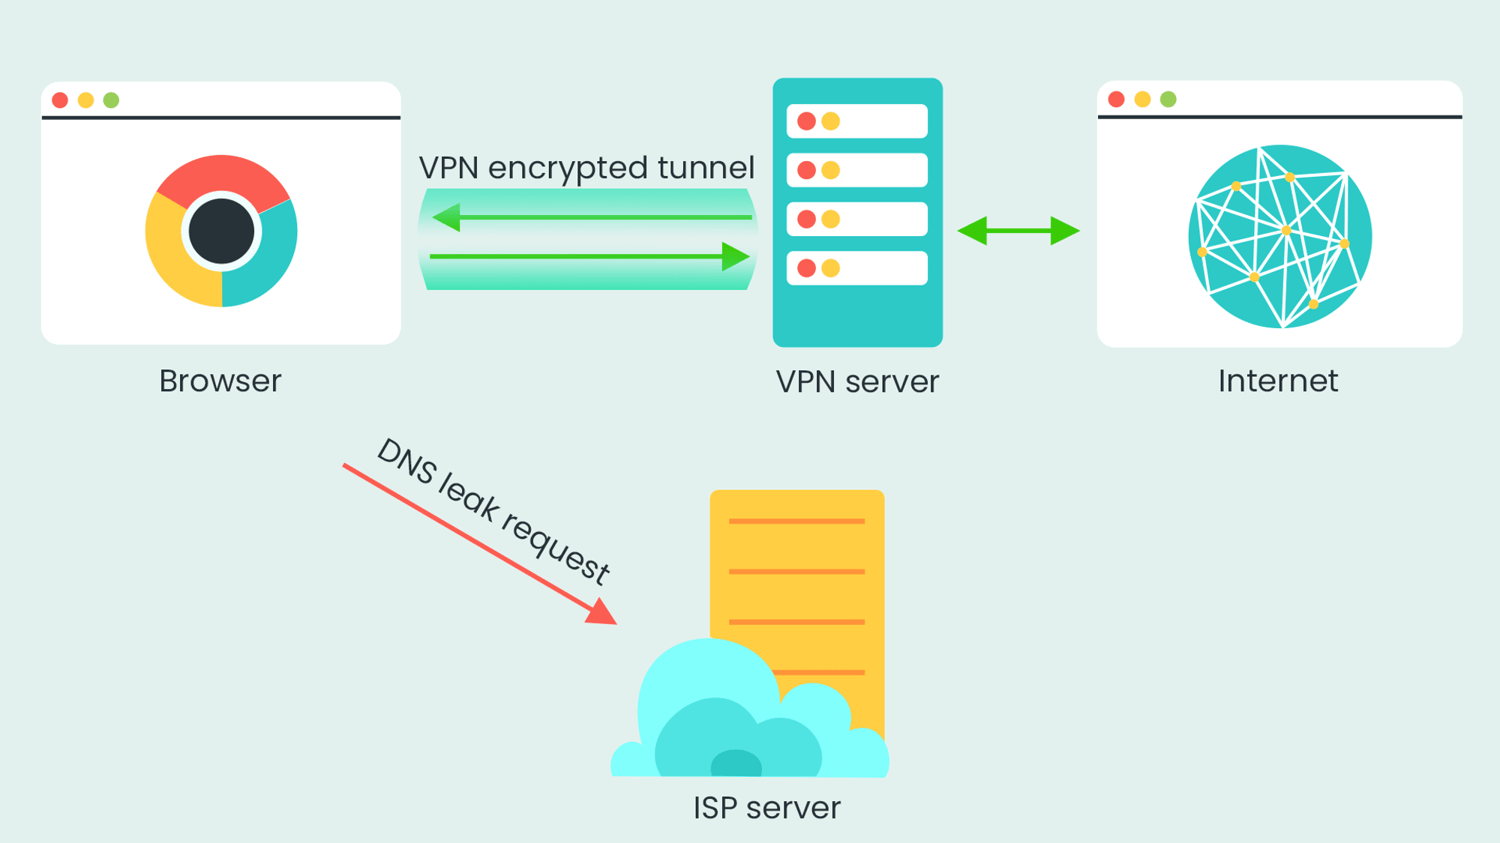
When you try to visit a website, your computer sends a DNS request to turn the website's name into a numerical IP address. This request is supposed to go through the VPN.
Step 3: Configuration Problems
Sometimes, due to setup errors or software glitches, your computer might not send the DNS request through the VPN. Instead, it might use the usual network route to your ISP's DNS service.
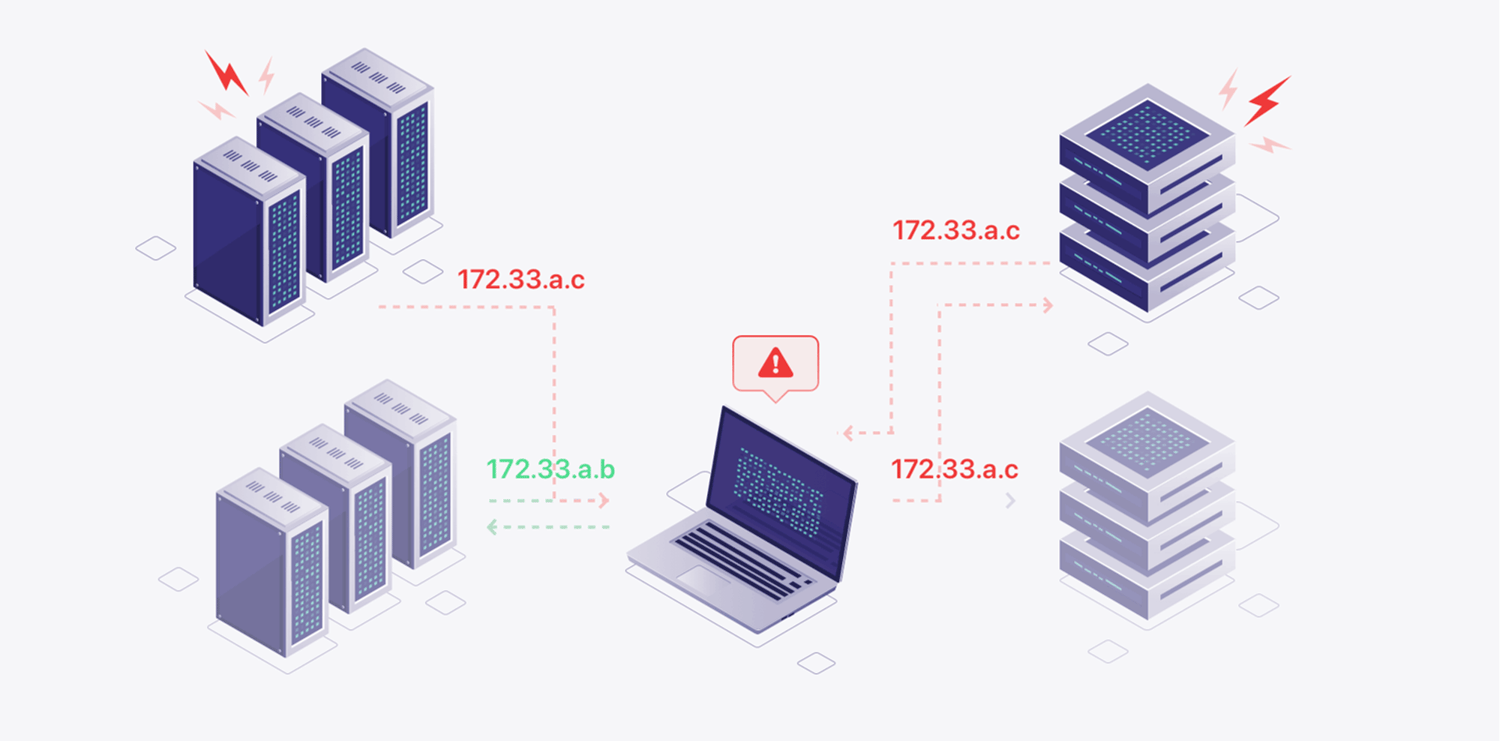
Step 4: DNS Leak Occurs
The DNS request bypasses the VPN and reaches the ISP's DNS service, which can then see and possibly log your internet activity. This is called a DNS leak.
Step 5: Exposure of Online Activity
Since the DNS requests are outside the VPN, websites and services you visit can detect and log your real IP address, defeating the purpose of using a VPN for privacy.
What causes a DNS leak?
Incorrect VPN Configuration
When you manually set up a VPN, you must enter many settings, including DNS servers. Mistakes or missed steps can cause your internet requests to bypass the VPN and go through your regular Internet Service Provider (ISP) instead. This can lead to DNS leaks, as your ISP can see which websites you visit.
Misconfigured Setup
Even with a VPN, your device might send DNS requests outside the secure VPN tunnel. This means your ISP or other DNS servers can track which websites you're visiting. This can happen if the VPN isn't set up correctly or if there are software bugs.
Handling DNS Requests
Normally, your device's DNS requests (which translate domain names to IP addresses) are handled by your ISP’s DNS servers. Using a VPN, you expect these requests to go through the encrypted VPN tunnel for enhanced privacy. If this doesn't happen, a DNS leak can occur.
Operating System Settings
Your computer's settings can sometimes interfere with the VPN. Some features might cause DNS requests to bypass the VPN because operating systems often try to find the fastest way to resolve DNS requests, even if it means skipping the VPN.
Switching Networks
Switching between different Wi-Fi networks or between mobile data and Wi-Fi can cause your device to temporarily disconnect from the VPN. This brief disconnection can cause a temporary DNS leak.
💡 Tip: A kill switch can help. It will automatically disconnect your internet if your VPN disconnects. Try X-VPN for this feature!

Software Applications
Some apps might ignore VPN settings and send DNS requests directly to your ISP due to their programming. This allows your ISP to see which websites you're visiting.
💡 Note: Many factors can contribute to DNS leaks, such as VPN setup, operating system settings, or software applications. It's important to regularly test for DNS leaks to ensure that all DNS requests are securely routed through the VPN tunnel. Choose a VPN with DNS leak protection to help keep your browsing private.
Why should you care a DNS leak?
Privacy Concerns:
The main reason to use a VPN is to protect your privacy and security online. A DNS leak undermines this goal because your internet activities become visible to your Internet Service Provider (ISP) or other potential snoopers. This exposure defeats the purpose of using a VPN to stay anonymous.
Bypassing Concerns:
Many people use VPNs to access content or services that aren't available in their region. DNS leaks can reveal your real location, making it harder to bypass geo-restrictions and access the content you want.
Potential Tracking and Monitoring:
Third-party DNS servers can log your DNS requests, which means they could track your online behavior and build a profile about you. This compromises your privacy.
💡 The website itself is secure? Don't take it lightly: Some websites use HTTPS with HSTS (HTTP Strict Transport Security) to ensure encrypted connections. However, if your DNS requests leak, attackers could use DNS hijacking techniques to redirect you to fake versions of websites, bypassing the protection that HTTPS offers.
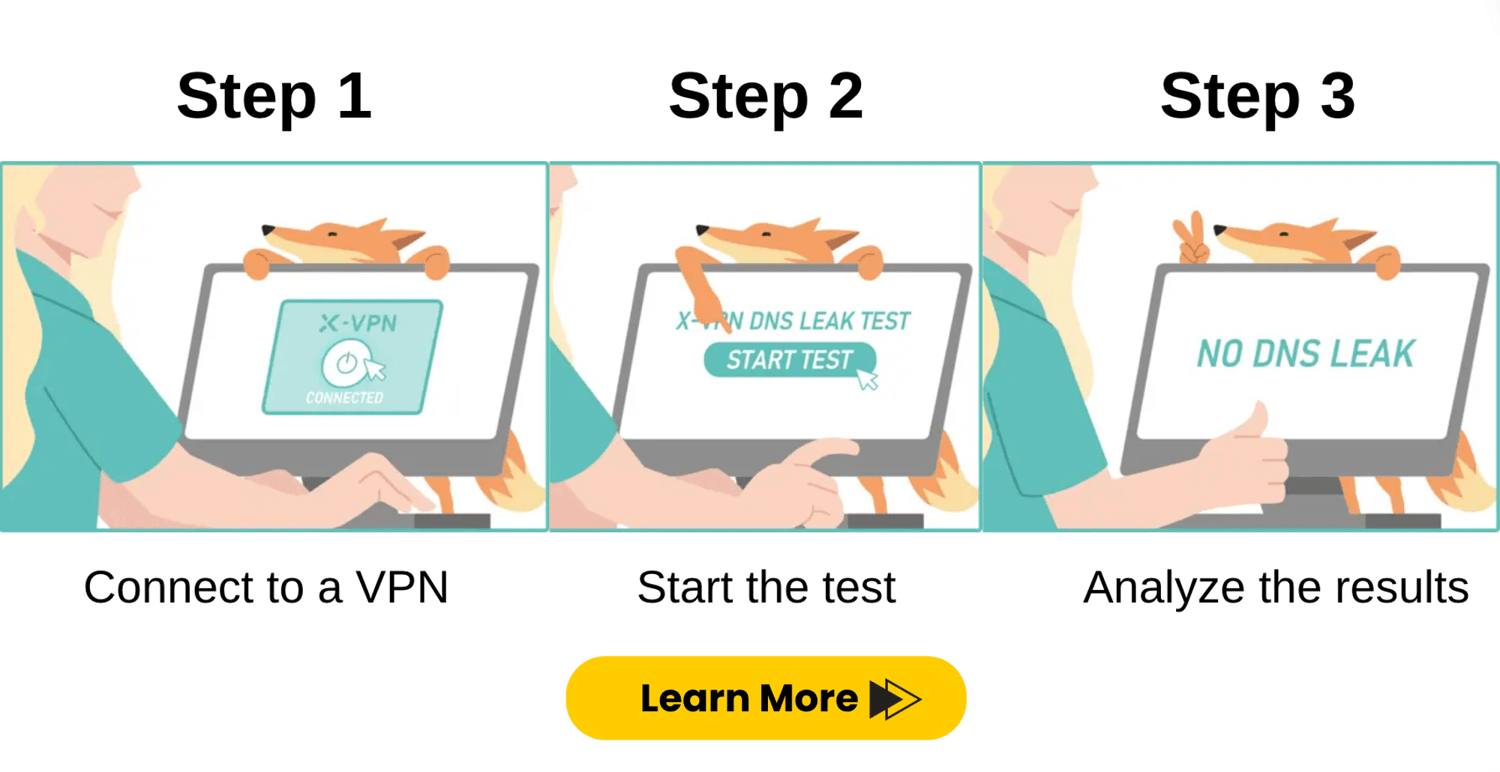
How to do the DNS leak test?
If you notice a slower internet connection and unexpected pop-ups or ads, you might be experiencing a DNS leak. It's time to do a DNS leak test to check your internet security. Here are the detailed steps:
1. Check Your IP Address:
Before starting the DNS leak test, check your current IP address without the VPN. You can use the IP lookup tool to see your IP address.
2. Connect to VPN:
Next, connect to your VPN service on your device. Make sure the VPN is active and running correctly.
3. Visit the DNS Leak Test Page:
Go to the DNS Leak Test page to begin the test.
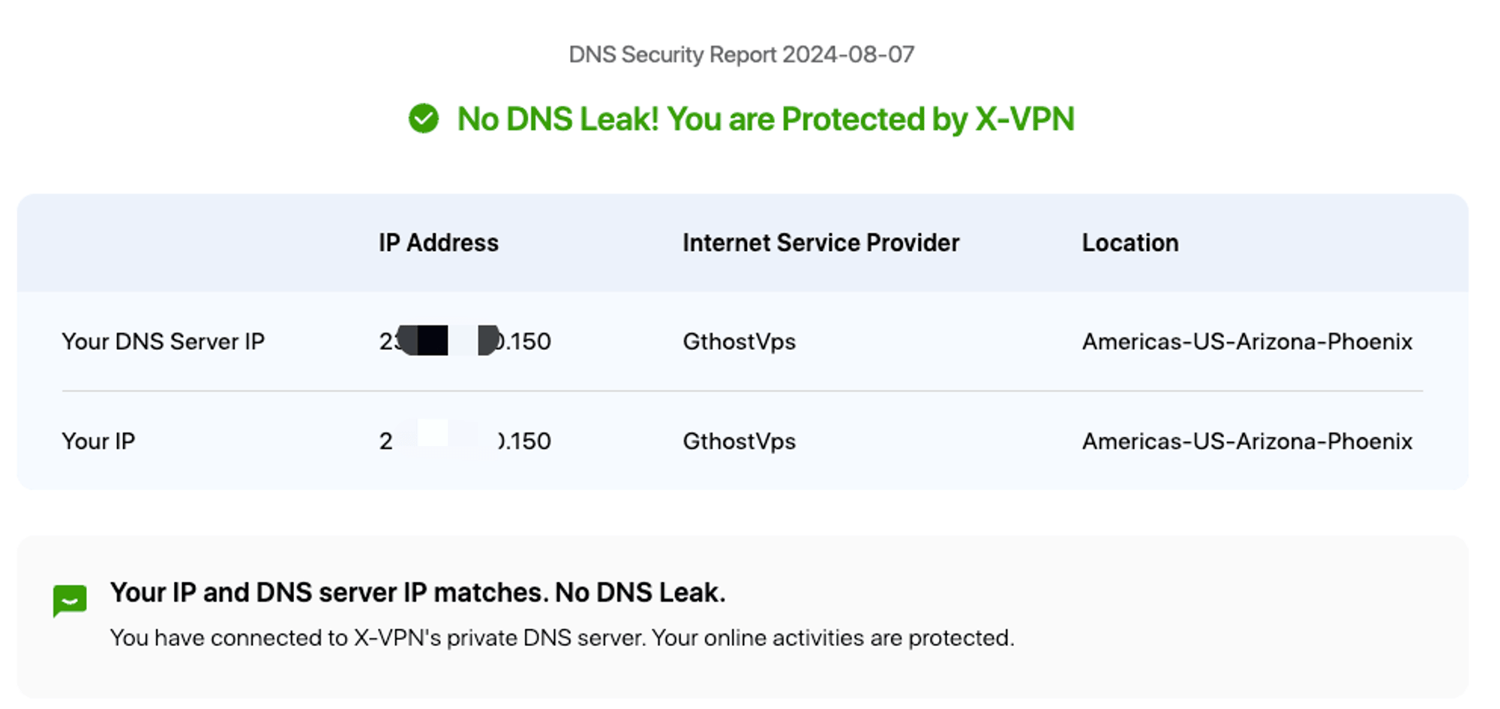
4. Check the Results:
Look at the IP address shown in the test results. If it is different from the one assigned by your ISP, it usually means the VPN is using its own DNS server. This indicates that your DNS requests are being securely handled by the VPN, and there is no DNS leak. If you're using X-VPN, you should see a message saying, "No leak, you are protected by X-VPN."
🙌 BONUS: We've launched more easy-to-use security tools, including an IP address checker, WebRTC leak test, IPv6 leak test, and Password generator. More cool tools are on the way. We're more than happy to invite you to explore them!
How to prevent a DNS leak?
Choose a Reliable VPN
Select a reputable VPN service that explicitly offers DNS leak protection as one of its features. Most good VPNs include DNS leak protection settings in their apps.
💡 Tip: X-VPN provides private DNS and military-grade AES-256 encryption with protocols like OpenVPN, WireGuard, and Private Everest Protocol, giving you strong protection against DNS leaks.

Use OpenDNS or Google DNS
Some VPNs let you manually configure DNS servers. Set your DNS servers to trusted options like OpenDNS (208.67.222.222 and 208.67.220.220) or Google DNS (8.8.8.8 and 8.8.4.4). These servers are generally more secure and less likely to leak.
Disable Teredo
Teredo is a technology used for IPv6 transition. It can sometimes cause DNS leaks. You can disable Teredo through the Command Prompt or PowerShell on Windows.
Disable WebRTC
Web Real-Time Communication (WebRTC) can sometimes leak your local IP address, even when using a VPN. Some VPN providers offer built-in WebRTC leak protection, or you can use browser extensions to disable WebRTC.
Regularly Update and Monitor
Keep your VPN software updated to the latest version. Periodically run DNS leak tests to check for any potential leaks.
To prevent DNS leaks, choose a reputable VPN provider with built-in DNS leak protection. Additionally, test your VPN for DNS leaks using online tools and take steps to manually configure your device's DNS settings to avoid leaks. Always stay vigilant about your online privacy and security, and regularly review your VPN's settings and features.
How does X-VPN stop a DNS leak?
X-VPN uses advanced techniques to protect against DNS leaks, keeping your internet activity private and secure. Here’s how it works:
Private DNS Servers
When you connect to X-VPN, all your DNS requests are routed through our private DNS servers. By intercepting these requests, X-VPN ensures they travel through an encrypted tunnel, preventing leaks that could expose your browsing activity.
End-to-End Encryption
X-VPN uses military-grade AES-256 encryption to secure all communication between your device and their DNS servers. This encryption ensures that even if someone intercepts the data, they cannot read it. The use of protocols like OpenVPN and WireGuard further enhances this security by creating a safe and encrypted pathway for your internet traffic.
No Logging Policy
X-VPN does not keep any activity or connection logs. This commitment to privacy means that your browsing history is not recorded, adding an extra layer of protection against potential leaks or data breaches.
Secure DNS Request Handling
Whenever you want to visit a website, your device sends a request through the encrypted tunnel to X-VPN's DNS server. The DNS server processes this request and returns the relevant IP address. This process keeps all your DNS queries within the secure environment provided by X-VPN, preventing exposure to third parties.
By using these techniques, X-VPN effectively prevents DNS leaks, maintaining your online privacy and allowing you to browse the internet securely.
Conclusion
A DNS leak is a significant privacy concern because it can reveal the websites you visit and potentially allow third parties to track your internet activity. Therefore, regularly performing DNS leak tests and choosing a reliable VPN are crucial steps to protect your online privacy.
Fortunately, X-VPN offers a comprehensive solution. It provides a free DNS leak test tool on its official website and top-tier security features to ensure a safe and private browsing experience. Give it a try today!


Aria Penelope Hart
Aria Penelope Hart is a tech enthusiast with a zest for making VPN and online security topics accessible and engaging. Through her lively and approachable writing style, Aria simplifies complex concepts for newcomers, helping them secure their online privacy with ease. When not decoding tech mysteries, she enjoys exploring new challenges and engaging her readers in the digital age.
Online Security and Freedom in one app.
Protect online privacy and unlock internet freedom with our VPN
FAQs
What is DNS?
DNS (Domain Name System) translates domain names into IP addresses, allowing browsers to access websites and other internet resources. Every device on the internet has an IP address, which other devices can use to locate it. Instead of memorizing a long list of IP addresses, people can simply enter the name of the website, and the DNS retrieves the IP address for them.
What is a DNS leak?
A DNS leak occurs when your DNS requests are sent to your ISP instead of being routed through your VPN, allowing your ISP to see the websites you visit. This compromises your privacy. To avoid DNS leaks, use a VPN with DNS leak protection and regularly test your connection with tools.
How to check if my DNS is leaking?
1. Connect to a VPN; 2. Visit X-VPN’s leak test page, which will start automatically.; 3. If it displays X-VPN's locations, you're secure. If it shows your ISP's servers, you have a DNS leak and need to contact X-VPN's support.
How to fix DNS leak?
To fix a DNS leak, use a VPN with DNS leak protection, manually configure your device to use secure DNS servers, disable IPv6 if necessary, and regularly test your connection with tools to ensure your DNS requests are routed through the VPN.
Follow Us on Social Media

Recent Articles
How to Use VPNs for Secure Social Media Management
Jul 29, 2024 | 9 mins to readHow to Set Up a VPN on Windows 10/11?
Aug 14, 2024 | 7 mins to readHow to Use Signal App in Russia: Solve Signal Ban
Aug 12, 2024 | 4 mins to read30 Best FMovies Alternatives in 2024 (Still Working)
Aug 12, 2024 | 14 mins to readAccess anything anywhere anonymously with X-VPN
24/7 one-one live chat support
Ultimate protection for 5 devices
Access to all worldwide contents
8000+ servers at 225 locations
30-DAY MONEY-BACK GUARANTEE